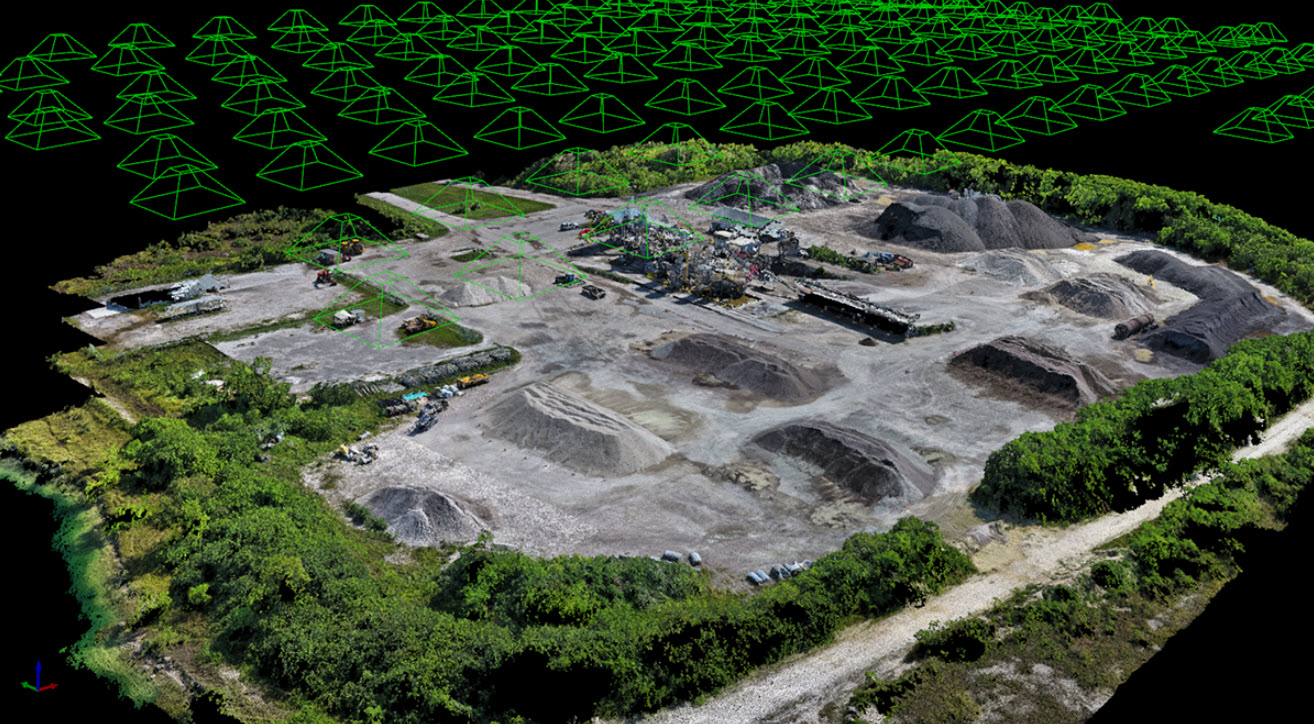
An image of a point cloud

The Role of Drones in Cut and Fill Calculations on Construction Sites

Introduction

The construction industry has increasingly adopted drone technology for various applications, including cut and fill calculations. These calculations are essential for earthwork operations, determining the volumes of material to be excavated or added to achieve the desired landform. This article explores the role of drones in cut and fill calculations, explaining the process, benefits, methods, capabilities, and environmental impact, with a focus on Real-Time Kinematic (RTK) technology and ground control points (GCPs).

What Are Cut and Fill Calculations?

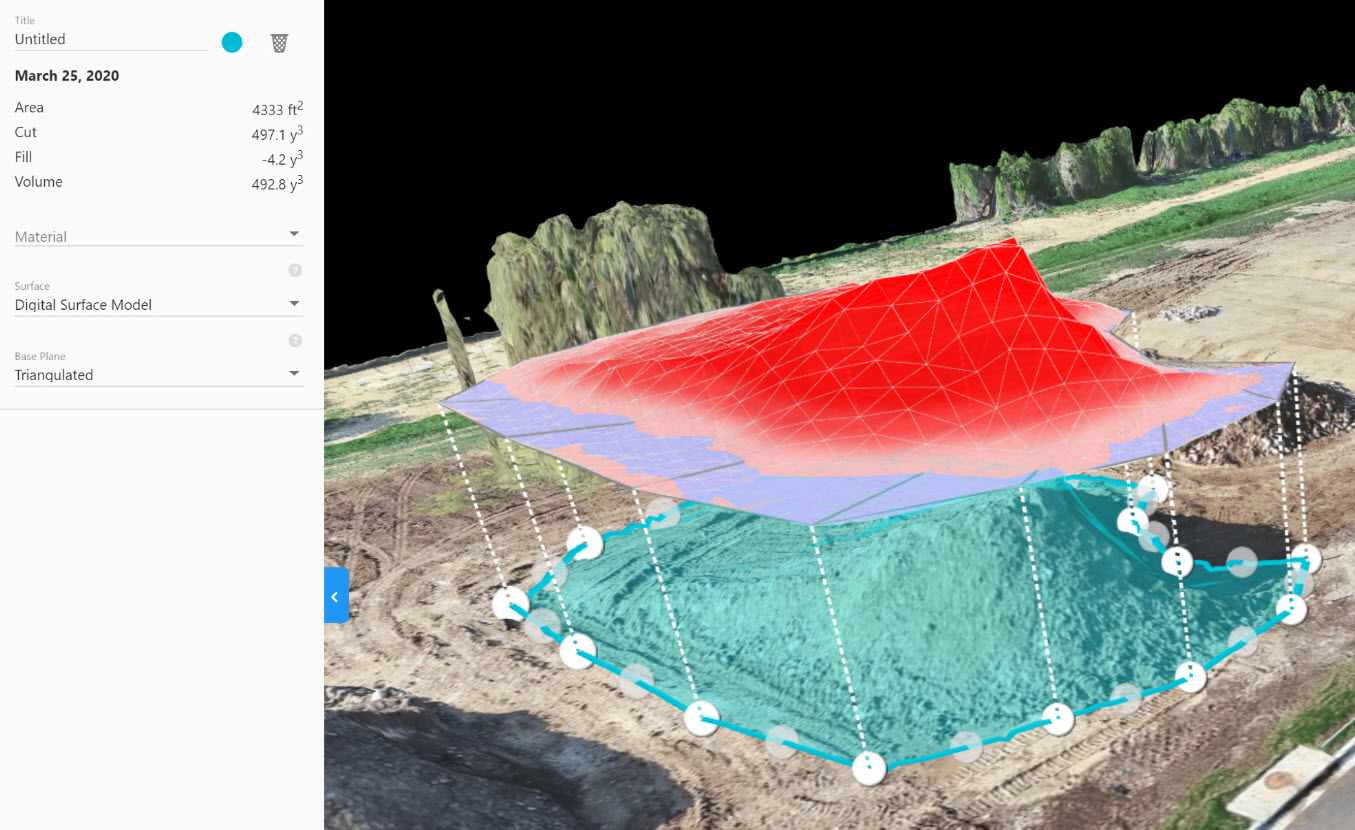
Cut and fill calculations involve determining the volumes of earth that need to be excavated (cut) or added (fill) to achieve the desired landform. These calculations are crucial for preparing construction sites, ensuring that the ground is leveled or shaped according to the project’s specifications. Accurate cut and fill calculations help in planning earthwork operations, optimizing material movement, and minimizing costs.

Benefits of Using Drones

  1. Enhanced Accuracy Drones equipped with RTK technology and GCPs can achieve centimeter-level accuracy in topographical data. This precision is crucial for accurate volume calculations, ensuring that projects stay within budget and on schedule1.
  2. Time Efficiency Traditional surveying methods can take days or weeks to cover large areas. Drones can complete the same task in a fraction of the time, allowing for more frequent surveys and real-time monitoring of the site2.
  3. Cost Savings By reducing the time and labor required for surveys, drones significantly lower the overall cost of the project. Accurate data also helps optimize earth movement, preventing unnecessary work and material wastage3.
  4. Improved Safety Drones eliminate the need for workers to access potentially hazardous areas, such as steep slopes or unstable ground. This enhances site safety and reduces the risk of accidents2.
  5. Comprehensive Data Collection Drones can capture data from multiple angles and elevations, providing a comprehensive view of the site. This data can be used to create detailed 3D models and maps, which are invaluable for planning and decision-making4.

Methods of Using Drones for Cut and Fill Calculations

  1. Photogrammetry Photogrammetry involves taking numerous overlapping photographs of the site from different angles. These images are processed to create a detailed 3D model of the terrain. This method is highly effective for capturing large areas quickly and accurately1.
  2. LiDAR (Light Detection and Ranging) LiDAR uses laser pulses to measure distances to the ground. This method is particularly useful for capturing detailed elevation data, even in areas with dense vegetation. LiDAR can produce highly accurate digital elevation models (DEMs) essential for precise cut and fill calculations2.
  3. RTK (Real-Time Kinematic) Technology RTK technology enhances the accuracy of GPS data by using a fixed base station and a rover to provide real-time corrections. This results in centimeter-level accuracy, which is critical for precise volume calculations3.
  4. Ground Control Points (GCPs) GCPs are known coordinates placed on the ground and used to georeference aerial data. They improve the accuracy of drone surveys by providing fixed reference points for data alignment4.

Capabilities of Drones in Cut and Fill Calculations

  1. Real-Time Data Processing Modern drones are equipped with software that allows for real-time data processing. This capability enables construction teams to make immediate decisions based on the latest site data.
  2. Integration with CAD and BIM Software Drone data can be easily integrated with Computer-Aided Design (CAD) and Building Information Modeling (BIM) software. This integration allows for seamless planning and execution of construction projects3.
  3. Frequent Monitoring and Reporting Drones enable frequent monitoring of the construction site, providing up-to-date information on the progress of earthwork operations. This frequent reporting helps in identifying and addressing issues promptly2.

Comparison of Traditional Methods and Current Methods Using Software

  1. Traditional Methods Traditional methods of cut and fill calculations often involve manual surveying techniques such as the grid method and cross-section method. These methods require significant time and labor, and they are prone to human error2.
  2. Current Methods Using Software Modern software tools, combined with drone technology, offer significant advantages over traditional methods. Software such as EarthCalc and Propeller Aero provide automated calculations, high accuracy, and the ability to process large datasets quickly3. These tools also integrate with CAD and BIM software, enhancing project planning and execution.
  3. Potential Cost and Time Savings The use of drones and modern software can lead to substantial cost and time savings. Drones can survey large areas in a fraction of the time required by traditional methods, reducing labor costs and project timelines. Additionally, the high accuracy of drone data minimizes the risk of costly errors and rework4.

Environmental Impact

  1. Reduced Carbon Footprint Drone surveying minimizes the need for ground vehicles and heavy machinery, significantly reducing fuel consumption and carbon emissions. This is particularly beneficial during the earthworks stage, where precise cut and fill measurements help keep the movement of heavy machinery to a minimum1.
  2. Non-Invasive Surveying Traditional survey methods can disrupt natural ecosystems through the need to cut sight lines and make room for survey crews. In contrast, drones can quickly and quietly capture highly accurate images without disturbing surrounding habitats and species1.
  3. Minimized Soil Erosion and Vegetation Loss Accurate cut and fill calculations help minimize the amount of earthwork required, reducing soil erosion and loss of vegetation. This careful management of earth movement helps preserve the natural environment3.
  4. Sustainability and Resource Efficiency By providing precise data, drones help in efficient planning and execution, reducing the need for rework and conserving resources. This aligns with sustainability goals and reduces the ecological footprint of construction projects4.

Conclusion

The use of drones in cut and fill calculations offers numerous benefits, including enhanced accuracy, time efficiency, cost savings, improved safety, and comprehensive data collection. The methods and capabilities of drones, such as photogrammetry, LiDAR, RTK technology, and ground control points, further enhance their utility in construction projects. Additionally, the environmental benefits of using drones, such as reduced carbon footprint and minimized ecological disruption, make them an essential tool for sustainable construction practices.

References

  1. Propeller Aero. (n.d.). Calculating Cut and Fill Quantities on Your Construction Site. Retrieved from Propeller Aero
  2. Hammer Missions. (2023, August 15). How to Calculate Stockpile Volumes (Cut/Fill) using Drones. Retrieved from Hammer Missions
  3. Blue Falcon Aerial. (n.d.). Boosting Efficiency and Safety: Drones in Construction Site Mapping. Retrieved from Blue Falcon Aerial
  4. Volatus Aerospace. (n.d.). Cut Fill Surveying. Retrieved from Volatus Aerospace
  5. The Drone Life. (2024, January 18). Drone Construction Earthwork Surveys: The Complete Guide. Retrieved from The Drone Life

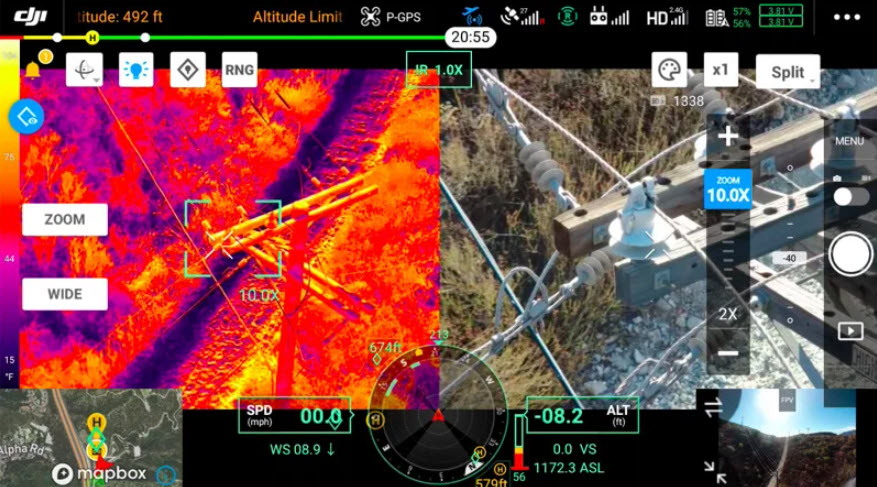
A split RGB and Thermal image

How Thermal Cameras Work: A Comprehensive Guide

Thermal cameras, also known as infrared (IR) cameras, are devices designed to detect and visualize heat radiation emitted by objects. Unlike conventional cameras that rely on visible light, thermal cameras create images based on temperature differences. This ability to “see” heat has made thermal imaging crucial in a wide range of applications, from medical diagnostics to military surveillance, wildlife observation, building inspections, and firefighting.

In this article, we’ll delve into how thermal cameras work, their underlying principles, and their diverse applications.

The Basics of Heat and Infrared Radiation

All objects emit infrared radiation, a form of electromagnetic energy that is invisible to the human eye. The intensity of this radiation depends on the object’s temperature: the hotter the object, the more IR radiation it emits. This is governed by Planck’s law, which describes how electromagnetic radiation is emitted by a blackbody in thermal equilibrium at a given temperature.

Infrared radiation falls just outside the visible light spectrum (wavelengths of about 0.7 to 1,000 micrometers), and thermal cameras are designed to detect radiation in this range, usually between 8 and 14 micrometers, where emitted heat is most easily captured.

Key Components of Thermal Cameras

To understand how thermal cameras work, it’s important to look at their core components:

a. Infrared Lens

The IR lens focuses infrared radiation onto the camera’s sensor. Unlike the lenses in conventional cameras, IR lenses are made from materials like germanium or chalcogenide glass, which are transparent to infrared light. Normal glass does not transmit IR well, so special optics are necessary.

b. Detector/Sensor

At the heart of a thermal camera is the infrared sensor, which detects heat signatures. Two common types of infrared detectors are:

  • Uncooled Detectors: These sensors operate at ambient temperature and don’t need cryogenic cooling. They are more common in commercial thermal cameras due to their lower cost and smaller size.
  • Cooled Detectors: These are highly sensitive detectors that require cooling to very low temperatures (often below -200°C) using cryogenic equipment. They offer higher resolution and sensitivity, but are bulkier and more expensive, typically found in scientific or military-grade thermal cameras.

The sensor array in a thermal camera captures the incoming IR radiation and converts it into electrical signals. This array is usually made up of microbolometers, tiny sensors that change their electrical resistance based on the amount of infrared energy absorbed.

c. Processing Electronics

Once the infrared radiation is detected, the camera’s processing unit converts the electrical signals into a digital image, known as a thermogram. The electronics assign different colors or shades of gray to different temperature ranges, helping the user to distinguish hot and cold areas.

Thermal images often use a false-color palette, where red, yellow, and white typically represent warmer areas, and blue, purple, or black represent cooler regions.

d. Display

The processed image is then displayed on a screen, where users can view it in real-time. Modern thermal cameras often come with options to switch between various color schemes and image overlays to better interpret the heat signatures.

How Thermal Cameras Create Images

Thermal cameras detect the minute differences in temperature and generate an image that represents the heat map of a scene. The process typically works as follows:

  1. Heat Detection: The camera detects IR radiation from objects in the scene, capturing even the smallest temperature variations.
  2. Signal Conversion: The IR radiation is converted into an electrical signal by the sensor.
  3. Thermogram Creation: The electrical signals are processed and converted into a thermogram, where each pixel in the image represents a temperature reading.
  4. Color Mapping: The thermogram is then color-coded based on temperature. For instance, a red area might represent higher heat, while blue might represent cooler areas.

Applications of Thermal Cameras

The ability to visualize heat has opened a wide range of applications for thermal cameras:

a. Medical Imaging

Thermal imaging is used to detect temperature changes on the skin, which can help identify areas of inflammation or blood circulation issues. It is commonly used in diagnostics for detecting fevers, arthritis, and other conditions.

b. Building and Infrastructure Inspections

Thermal cameras can detect heat leaks, water damage, or electrical issues in buildings. By visualizing areas of heat loss, contractors can identify problems in insulation or pinpoint overheating electrical components before they cause damage.

c. Firefighting

Firefighters use thermal cameras to see through smoke, locate people, and assess hot spots in fire situations. These cameras are vital tools in search and rescue operations, as well as in managing fire control.

d. Military and Law Enforcement

Thermal cameras are commonly used in surveillance, reconnaissance, and targeting. Since they don’t rely on visible light, they can function effectively in low-light or completely dark environments, making them ideal for night operations.

e. Wildlife and Environmental Monitoring

Thermal cameras are used by ecologists to track animal movements at night, monitor heat signatures of wildlife, and assess environmental changes, such as deforestation or habitat destruction.

f. Industrial Use

In industries such as manufacturing, thermal cameras monitor machinery for overheating or irregularities, preventing costly breakdowns and improving safety protocols.

Limitations of Thermal Cameras

While thermal cameras are incredibly useful, they do have limitations:

  • Lack of Detail: Thermal images are not as sharp or detailed as regular photographs, which can make it difficult to identify small objects.
  • Limited Penetration: Thermal cameras cannot see through glass or water. Glass reflects infrared radiation, and water absorbs it, so these materials act as barriers.
  • Cost: High-end thermal cameras, especially those with cooled detectors, can be expensive, making them less accessible for everyday consumers.

The Future of Thermal Imaging

With advancements in sensor technology, processing power, and material science, thermal cameras are becoming smaller, more affordable, and more sensitive. Integration with drones, AI-powered analytics, and wearable technology is driving their use in fields like autonomous driving, health diagnostics, and disaster management.

Conclusion

Thermal cameras offer an unparalleled ability to visualize the world in terms of heat, opening doors to numerous scientific, industrial, and everyday applications. As the technology continues to evolve, we can expect to see thermal imaging being applied in even more innovative ways, transforming industries and improving safety, efficiency, and insights across various fields.

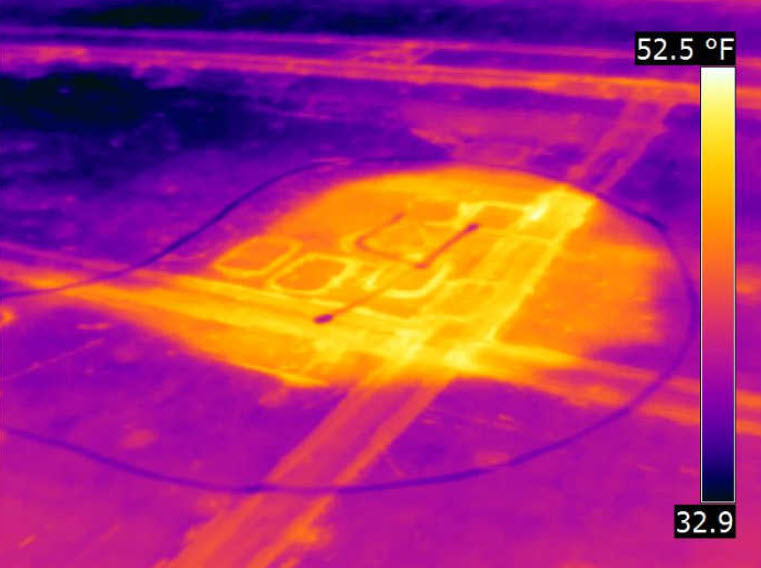
A thermal image of a roof leak

Moisture Detection in Built-Up Roof Systems: The Thermal Drone Inspection Process

Introduction

Built-up roofing (BUR) systems are a reliable choice for commercial buildings due to their robustness and longevity. However, moisture intrusion can compromise their integrity, leading to significant structural damage if not detected early. Traditional inspection methods may overlook hidden moisture, making thermal drones a valuable tool for modern assessments. This article outlines the inspection process, requirements, and specific conditions for effectively detecting moisture in BUR systems using thermal drones.

The Inspection Process


Pre-Inspection Preparation

Effective moisture detection begins with thorough preparation:

  • Review Roof History: Analyze records of previous inspections, repairs, and any known vulnerabilities. This context helps target the inspection on high-risk areas.
  • Weather Conditions: Schedule inspections to occur at least 24 hours after a rainstorm. This waiting period allows trapped moisture to become detectable on the roof surface. Additionally, it is crucial to choose days with wind speeds no higher than 15 mph to minimize heat transfer through convection. Conducting inspections at night further enhances visibility and improves temperature differentials.

Thermal Drone Setup

Once preparations are complete, it’s time to set up the thermal drone:

  • Calibration: Properly calibrate the thermal imaging camera to suit the specific environmental conditions. Accurate calibration is essential for distinguishing temperature variances indicative of moisture.
  • Flight Planning: Create a comprehensive flight plan that covers the entire roof area, accounting for obstacles such as HVAC units, vents, and parapets that could obstruct the drone’s flight path.

Data Collection

During the inspection, the drone will gather thermal images:

  • Flight Execution: Operate the drone at a consistent altitude and speed to capture high-resolution thermal images. Ensure adequate overlap between images for thorough data coverage.
  • Nighttime Operation: Conduct the inspection at night when the temperature differential is most pronounced. The cooler temperatures help enhance the visibility of moisture through thermal imaging, as damp areas will appear significantly cooler than dry sections.

Data Analysis

After collecting the thermal data, it’s time to analyze the images:

  • Identifying Temperature Anomalies: Look for cooler areas in the thermal images, which typically indicate moisture accumulation beneath the roofing layers.
  • Assessing Severity: Quantify the extent of detected moisture. This analysis aids in prioritizing areas needing further investigation or immediate remediation.

Reporting Findings

Compile a comprehensive inspection report that includes:

  • Thermal Images: Provide high-resolution images with annotations that highlight areas of concern and potential moisture intrusion.
  • Recommendations: Offer actionable insights based on the analysis, including suggestions for further evaluation or necessary repairs to address identified issues.

Requirements for Effective Inspections


To ensure a successful moisture detection inspection using thermal drones, several key requirements must be met:

  1. Trained Personnel: Operators should have training in both drone operation and thermal imaging interpretation. A deep understanding of both aspects is crucial for accurate assessments.
  2. Regulatory Compliance: Follow local regulations governing drone operation, including altitude limits and no-fly zones. Ensure that operators hold the necessary licenses for commercial drone use.
  3. Safety Protocols: Implement safety measures to protect personnel and equipment during the inspection. Close monitoring of environmental conditions is essential to avoid unsafe situations.

Conditions Influencing Moisture Detection


Several specific conditions significantly affect the effectiveness of thermal drone inspections:

  • Post-Rain Delay: Conducting inspections at least 24 hours after a rainstorm is crucial. This waiting period allows moisture to migrate to the roof surface, making it easier to detect.
  • Wind Speed Limitations: Inspections should occur in wind conditions no higher than 15 mph. High winds can create convective currents that transfer heat and obscure thermal readings, potentially leading to inaccurate assessments.
  • Nighttime Inspections: Performing inspections at night enhances visibility and allows for better differentiation of temperature variations. The cooler night temperatures amplify the contrast between wet and dry areas, improving the chances of detecting moisture.

Conclusion


Thermal drones represent a modern and efficient solution for detecting moisture in built-up roof systems. By following a structured inspection process and adhering to specific conditions—such as waiting 24 hours after rainfall, limiting wind speeds to 15 mph, and conducting inspections at night—facility managers can ensure effective moisture detection. This proactive approach not only helps maintain the integrity of roofs but also prevents costly repairs, ultimately safeguarding valuable building assets. As drone technology continues to advance, the potential for improved inspection practices will only increase, making thermal drones an indispensable tool for roof maintenance.

A AI generated image of a construction site with a point cloud above

Construction Site Surveys and Progress Evaluation

The Benefits of Using Drones in Construction Site Surveys and Report Generation

The construction industry is continually evolving, embracing technological advancements that enhance efficiency and accuracy. One of the most transformative innovations is the use of drones for site surveys. Drones not only streamline the data collection process but also provide a variety of reporting options that support project management and decision-making. Let’s explore the benefits of using drones in construction site surveys and the types of reports that can be generated.

Benefits of Using Drones in Construction Site Surveys


Increased Efficiency

Drones can cover vast areas in a fraction of the time required for traditional surveying methods. While ground crews may take days or weeks to gather data, drones can accomplish the same tasks in a few hours. This rapid data collection helps keep projects on schedule and allows for quicker adjustments when necessary.

Enhanced Accuracy and Precision

Equipped with advanced imaging technologies like LiDAR and photogrammetry, drones provide highly accurate measurements and detailed 3D models of construction sites. This accuracy minimizes the risk of errors in planning and execution, ensuring that project stakeholders have reliable data for decision-making.

Cost Savings

By reducing the need for extensive ground surveys, drones help lower labor costs and save time. Furthermore, the early identification of potential issues through aerial surveys can prevent costly rework and delays, ultimately leading to significant cost savings.

Safety Improvements

Drones can access hard-to-reach or hazardous areas, reducing the risk to workers on the ground. By using drones to conduct surveys in these environments, companies can enhance safety measures while ensuring compliance with regulations.

Real-Time Data Collection

Drones enable real-time data acquisition, allowing project managers to monitor progress continuously. This instant feedback facilitates timely decision-making, helping to address issues as they arise and keeping projects on track.

Comprehensive Site Analysis

Drones capture high-resolution images and videos that provide a thorough overview of the construction site. This visual data is essential for assessing site conditions, monitoring environmental impacts, and documenting progress throughout the project lifecycle.

Improved Communication and Collaboration

The visual reports generated from drone surveys can be easily shared with team members, clients, and stakeholders. This transparency fosters better collaboration and keeps everyone aligned on project goals and progress.

Types of Reports Generated from Drone Surveys


Drones can produce a variety of reports that support different aspects of construction project management. Here are some of the most common types:

Site Survey Reports

These reports include detailed maps and 3D models created from aerial imagery. They provide essential topographical data, helping teams assess land features and plan construction activities accordingly.

Progress Monitoring Reports

Drones can generate periodic progress reports that document construction milestones. These reports typically include comparative images over time, allowing project managers to visualize progress against timelines and budgets.

Volume Calculation Reports

Using drones, teams can calculate the volume of materials on-site, such as earthworks or stockpiles. This data is critical for inventory management and cost estimation, providing accurate figures for billing and resource allocation.

Inspection Reports

Drones are excellent for conducting inspections of structures and hard-to-reach areas. Inspection reports highlight potential issues, such as structural damage or safety hazards, and can be enhanced with annotated images for clarity.

Environmental Impact Reports

These reports assess the environmental effects of construction activities. Drones can monitor vegetation, water sources, and wildlife, ensuring compliance with environmental regulations and promoting sustainable practices.

Safety Assessment Reports

By documenting site conditions and worker activities from above, drones can help generate safety assessment reports. These reports highlight compliance with safety standards and can be used for training purposes.

As-Built Documentation

Drones can capture comprehensive data of the completed project, producing as-built documentation that reflects the final conditions. This information is invaluable for future maintenance, renovations, or legal purposes.

Conclusion


The integration of drones into construction site surveys brings a host of benefits, from increased efficiency and accuracy to improved safety and cost savings. The various reports generated through drone technology provide actionable insights that enhance project management and decision-making. As the construction industry continues to embrace this innovative tool, the potential for optimized workflows and enhanced project outcomes will only grow. Drones are not just a technological novelty; they are a vital asset in modern construction practices.

The Benefits of Drone-Based Thermal Solar Panel Inspections

As solar energy continues to grow in popularity, the need for effective maintenance and monitoring of solar panel systems is becoming increasingly important. One innovative solution is the use of drones equipped with thermal imaging technology for inspections. This method not only enhances the efficiency and accuracy of inspections but also identifies a range of issues, particularly electrical failures. This article discusses the benefits of drone-based thermal solar panel inspections, the specific problems they can uncover, and the cost implications associated with failing panels.

Benefits of Thermal Inspections


Proactive Problem Detection

Thermal inspections allow for early detection of problems, helping to prevent minor issues from escalating into major failures. By identifying temperature anomalies, operators can address issues before they lead to costly repairs or replacements.

Enhanced Energy Efficiency

Identifying underperforming panels through thermal inspections can significantly enhance the energy output of a solar system. Addressing inefficiencies promptly ensures that the system operates at its maximum potential.

Cost Savings

Investing in thermal inspections can lead to substantial long-term savings. Early intervention minimizes the risk of expensive repairs and replacements, allowing property owners to protect their investment in solar technology.

Improved Safety

Thermal inspections can identify components that are overheating, which poses fire risks. Detecting these hot spots early contributes to safer solar panel operations, giving property owners peace of mind.

Detailed Reporting

Thermal inspections generate comprehensive reports documenting the condition of solar panel systems. These reports are crucial for tracking performance over time and making informed maintenance decisions.

Benefits of Drone-Based Inspections


Enhanced Efficiency and Speed

Using drones for thermal inspections dramatically reduces the time required to assess solar panel installations. Drones can cover large areas quickly and efficiently, allowing operators to conduct comprehensive inspections in a fraction of the time it would take to do so manually.

Increased Safety

Drone inspections minimize the need for personnel to work at heights or in potentially hazardous environments. This approach reduces the risk of accidents and injuries, making the inspection process safer for workers.

High-Resolution Imaging

Drones equipped with advanced thermal cameras provide high-resolution images that can reveal even the smallest anomalies in temperature. This level of detail allows for more accurate assessments of panel health and performance.

Accessibility to Difficult Areas

Drones can easily access hard-to-reach areas of solar installations, such as large rooftops or sprawling solar farms. This capability ensures that all panels are thoroughly inspected, regardless of their location.

Comprehensive Data Collection

Drones can collect a wealth of data during inspections, allowing for thorough analysis and tracking of performance over time. This data can be invaluable for maintenance planning and financial forecasting.

Issues Identified Through Thermal Inspections


Hot Spots

Description: Hot spots are areas of a solar panel that exhibit significantly higher temperatures than surrounding areas.

Visual Identifiers:

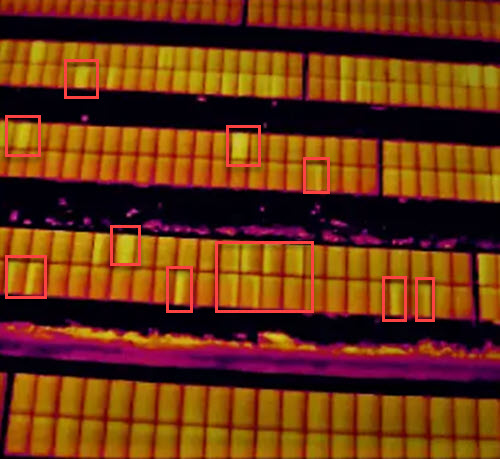
  • Appearing as bright yellow or white areas on thermal images.

Causes:

  • Damage to solar cells, faulty electrical connections, or debris can create hot spots, which indicate a failure that may require immediate attention.

Module Misalignment

Description: Panels that are not optimally positioned for sunlight can experience reduced efficiency.

Visual Identifiers:

  • Thermal images showing uneven temperature distribution, with some modules appearing cooler.

Causes:

  • Installation errors or shifting over time can lead to misalignment, resulting in lower energy output.

Inverter Malfunctions

Description: Inverters are crucial for converting the DC power generated by solar panels into AC power.

Visual Identifiers:

  • Elevated temperatures or hot spots around the inverter on thermal images.

Causes:

  • Faulty components within the inverter can lead to overheating and reduced efficiency.

Shading Effects

Description: Shading from nearby trees or structures can impede sunlight access.

Visual Identifiers:

  • Cooler areas that appear as dark patches on thermal images.

Causes:

  • Obstructions can significantly reduce energy production by blocking sunlight.

Delamination

Description: Delamination refers to the separation of layers within a solar panel.

Visual Identifiers:

  • Unusual temperature variations on thermal images, with some sections appearing cooler or hotter.

Causes:

  • Moisture ingress or poor sealing can lead to delamination, negatively impacting performance.

Electrical Connection Issues

Description: Poor electrical connections can create increased resistance and overheating.

Visual Identifiers:

  • Localized hot spots around junction boxes or connections on thermal images.

Causes:

  • Loose or corroded connections can lead to inefficiencies and reduced system performance.

Diode Failures

Description: Diodes prevent reverse current flow in solar panels.

Visual Identifiers:

  • Cold spots on thermal images, indicating areas that are not producing power effectively.

Causes:

  • Failed bypass diodes can lead to energy losses and contribute to overheating elsewhere in the panel.

Reverse Polarity

Description: Reverse polarity occurs when the positive and negative wires are connected incorrectly.

Visual Identifiers:

  • Abnormal temperature patterns around junction boxes.

Causes:

  • Incorrect wiring during installation can lead to overheating and potential damage to components.

Ground Faults

Description: Ground faults occur when electrical current leaks to the ground.

Visual Identifiers:

  • Thermal images showing unusual heat patterns near grounding connections.

Causes:

  • Damaged insulation or wiring issues can pose serious safety hazards.

Interconnect Failures

Description: Interconnects link individual solar cells within a panel.

Visual Identifiers:

  • Hot spots or cooler areas on thermal images indicating potential failures.

Causes:

  • Physical damage or manufacturing defects can impact performance.

Cost Implications of Failing Panels


Failing solar panels can have significant financial repercussions, not only affecting the individual panels but also the entire system’s performance. Here’s how:

  • Decreased Energy Production: A single malfunctioning panel can reduce the total energy output of the entire solar array. This reduction directly impacts energy savings and return on investment.
  • Increased Maintenance Costs: Ignoring minor issues can lead to major failures that require expensive repairs or replacements. Regular drone inspections can help identify and address problems early, mitigating these costs.
  • Extended Payback Periods: If energy production decreases due to failing panels, the time required to recoup the initial investment in solar technology can lengthen, affecting overall financial viability.
  • Potential Component Replacement: Severe issues may necessitate the replacement of panels, inverters, or other components, leading to significant additional costs.

Conclusion


Drone-based thermal solar panel inspections offer a powerful solution for maintaining the efficiency and reliability of solar energy systems. By identifying a range of issues—from hot spots and electrical failures to misalignments and shading effects—these inspections provide critical insights that help optimize performance, enhance safety, and save costs. The financial implications of failing panels can be substantial, affecting energy production and overall investment returns. Embracing drone technology for thermal inspections is not just a smart move; it’s essential for maximizing the benefits of solar power and ensuring a sustainable energy future.

Do you own solar panels
Have they ever been inspected
Are they still under warranty

Do not wait until a major costly failure happens!

MENU

Verified by MonsterInsights