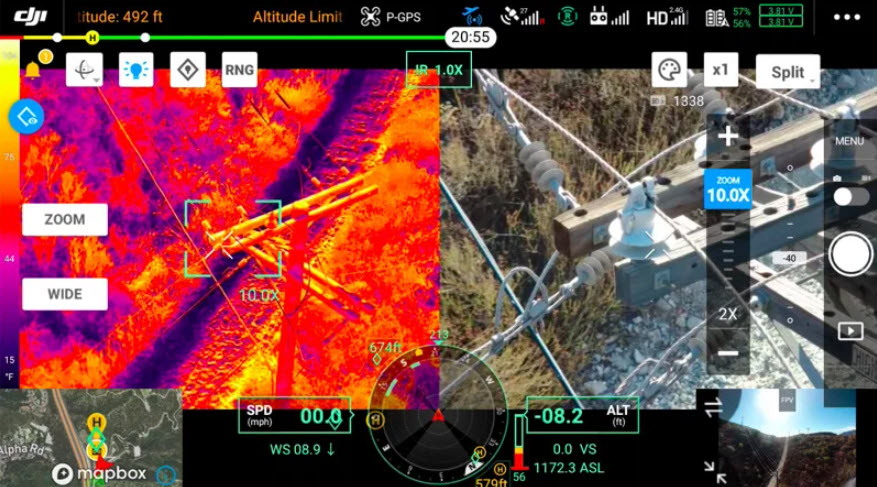
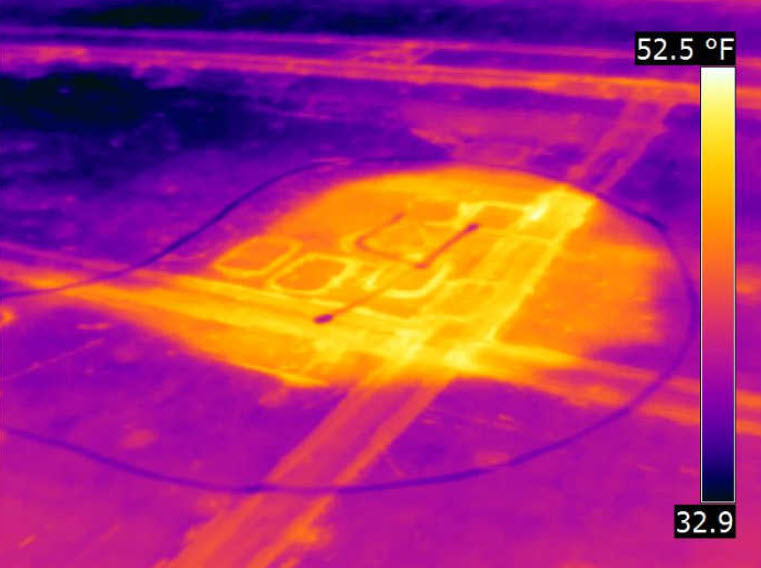
Thermal cameras, also known as infrared (IR) cameras, are devices designed to detect and visualize heat radiation emitted by objects. Unlike conventional cameras that rely on visible light, thermal cameras create images based on temperature differences. This ability to “see” heat has made thermal imaging crucial in a wide range of applications, from medical diagnostics to military surveillance, wildlife observation, building inspections, and firefighting.
In this article, we’ll delve into how thermal cameras work, their underlying principles, and their diverse applications.
The Basics of Heat and Infrared Radiation
All objects emit infrared radiation, a form of electromagnetic energy that is invisible to the human eye. The intensity of this radiation depends on the object’s temperature: the hotter the object, the more IR radiation it emits. This is governed by Planck’s law, which describes how electromagnetic radiation is emitted by a blackbody in thermal equilibrium at a given temperature.
Infrared radiation falls just outside the visible light spectrum (wavelengths of about 0.7 to 1,000 micrometers), and thermal cameras are designed to detect radiation in this range, usually between 8 and 14 micrometers, where emitted heat is most easily captured.
Key Components of Thermal Cameras
To understand how thermal cameras work, it’s important to look at their core components:
a. Infrared Lens
The IR lens focuses infrared radiation onto the camera’s sensor. Unlike the lenses in conventional cameras, IR lenses are made from materials like germanium or chalcogenide glass, which are transparent to infrared light. Normal glass does not transmit IR well, so special optics are necessary.
b. Detector/Sensor
At the heart of a thermal camera is the infrared sensor, which detects heat signatures. Two common types of infrared detectors are:
- Uncooled Detectors: These sensors operate at ambient temperature and don’t need cryogenic cooling. They are more common in commercial thermal cameras due to their lower cost and smaller size.
- Cooled Detectors: These are highly sensitive detectors that require cooling to very low temperatures (often below -200°C) using cryogenic equipment. They offer higher resolution and sensitivity, but are bulkier and more expensive, typically found in scientific or military-grade thermal cameras.
The sensor array in a thermal camera captures the incoming IR radiation and converts it into electrical signals. This array is usually made up of microbolometers, tiny sensors that change their electrical resistance based on the amount of infrared energy absorbed.
c. Processing Electronics
Once the infrared radiation is detected, the camera’s processing unit converts the electrical signals into a digital image, known as a thermogram. The electronics assign different colors or shades of gray to different temperature ranges, helping the user to distinguish hot and cold areas.
Thermal images often use a false-color palette, where red, yellow, and white typically represent warmer areas, and blue, purple, or black represent cooler regions.
d. Display
The processed image is then displayed on a screen, where users can view it in real-time. Modern thermal cameras often come with options to switch between various color schemes and image overlays to better interpret the heat signatures.
How Thermal Cameras Create Images
Thermal cameras detect the minute differences in temperature and generate an image that represents the heat map of a scene. The process typically works as follows:
- Heat Detection: The camera detects IR radiation from objects in the scene, capturing even the smallest temperature variations.
- Signal Conversion: The IR radiation is converted into an electrical signal by the sensor.
- Thermogram Creation: The electrical signals are processed and converted into a thermogram, where each pixel in the image represents a temperature reading.
- Color Mapping: The thermogram is then color-coded based on temperature. For instance, a red area might represent higher heat, while blue might represent cooler areas.
Applications of Thermal Cameras
The ability to visualize heat has opened a wide range of applications for thermal cameras:
a. Medical Imaging
Thermal imaging is used to detect temperature changes on the skin, which can help identify areas of inflammation or blood circulation issues. It is commonly used in diagnostics for detecting fevers, arthritis, and other conditions.
b. Building and Infrastructure Inspections
Thermal cameras can detect heat leaks, water damage, or electrical issues in buildings. By visualizing areas of heat loss, contractors can identify problems in insulation or pinpoint overheating electrical components before they cause damage.
c. Firefighting
Firefighters use thermal cameras to see through smoke, locate people, and assess hot spots in fire situations. These cameras are vital tools in search and rescue operations, as well as in managing fire control.
d. Military and Law Enforcement
Thermal cameras are commonly used in surveillance, reconnaissance, and targeting. Since they don’t rely on visible light, they can function effectively in low-light or completely dark environments, making them ideal for night operations.
e. Wildlife and Environmental Monitoring
Thermal cameras are used by ecologists to track animal movements at night, monitor heat signatures of wildlife, and assess environmental changes, such as deforestation or habitat destruction.
f. Industrial Use
In industries such as manufacturing, thermal cameras monitor machinery for overheating or irregularities, preventing costly breakdowns and improving safety protocols.
Limitations of Thermal Cameras
While thermal cameras are incredibly useful, they do have limitations:
- Lack of Detail: Thermal images are not as sharp or detailed as regular photographs, which can make it difficult to identify small objects.
- Limited Penetration: Thermal cameras cannot see through glass or water. Glass reflects infrared radiation, and water absorbs it, so these materials act as barriers.
- Cost: High-end thermal cameras, especially those with cooled detectors, can be expensive, making them less accessible for everyday consumers.
The Future of Thermal Imaging
With advancements in sensor technology, processing power, and material science, thermal cameras are becoming smaller, more affordable, and more sensitive. Integration with drones, AI-powered analytics, and wearable technology is driving their use in fields like autonomous driving, health diagnostics, and disaster management.
Conclusion
Thermal cameras offer an unparalleled ability to visualize the world in terms of heat, opening doors to numerous scientific, industrial, and everyday applications. As the technology continues to evolve, we can expect to see thermal imaging being applied in even more innovative ways, transforming industries and improving safety, efficiency, and insights across various fields.


